Whether you have a crew at your side or you’re going it alone, the tips below should help you get a solid foothold in The Division 2. These strategies are mostly for the opening hours of play, and only loosely touch on the PvP avenues. Following this roadmap will help you level up faster, and better situates you for longer stints in the wasteland. We also point you toward missions that will get you the best loot, and offer combat techniques that should help you keep the aggressive A.I at bay. Good luck out there, agents!
Skill Configuration
If you’re playing the game with friends, having each player equip different skills isn’t a bad idea, as you can create classes that favor assault and healing. If your group of four can deploy a Turret and Drone, disperse toxins with the Chem Launcher, and provide support with the Hive, you will make short work of the enemy forces. Even if you are assault in that role, we recommend having the Hive as a secondary skill, as it can help if you are separated from your healer, and is invaluable if you hop on to play some of the game single player. As much fun as it is to have a Drone or Turret, we highly recommend solo players go for the Hive first. You can add the firepower with the next skill you get.
Work On Your Skills
Just having the default abilities for each skill that is equipped is helpful, but you can boost their output significantly by unlocking their variant abilities. The turret transforms into an incinerator when upgraded, and the Hive can become a booster that increases your teammates’ combat efficiency. You’ll have to track down SHD Tech, and prioritize whether you’d prefer the new skill variation or a perk. Unlock safe houses to reveal the location of SHD Tech spread across the world. Specific side missions also deliver a nice haul of this upgrade currency.
Gear Manufacturers and Skill Mods
These are two things you may not even know about. All types of gear are created by a number of fictional manufacturers. The background image for each piece of gear tells you who the maker is. When you view the info screen for a piece of gear, you’ll see a number of bonuses that are awarded for wearing multiple pieces from the same brand. These bonuses can be significant and should always be taken into consideration when wearing something new, and when you’re considering selling or breaking down gear for crafting components. Like weapons, each of the skills you have equipped can also be modded. Click the “mod” button while viewing skills to see which augmentations you can add.
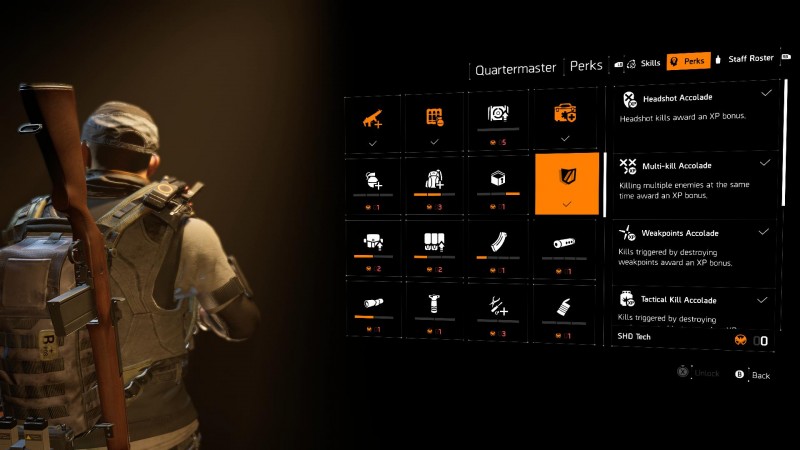
Beginner Perks
All of your introductory perk points should be invested in the XP bonuses. These skills reward you well for achieving headshots, multi-kills, exploiting weaknesses, using the environment, and even staying alive for long stretches at a time. You can’t go wrong with any of these – just make sure you get all of them as quickly as you can. The next perks we recommend are any that increase your capacities. Stash storage capacity isn’t needed right away, but upping your backpack inventory space, number of equippable armor kits, and size of crafting haul will help immensely.
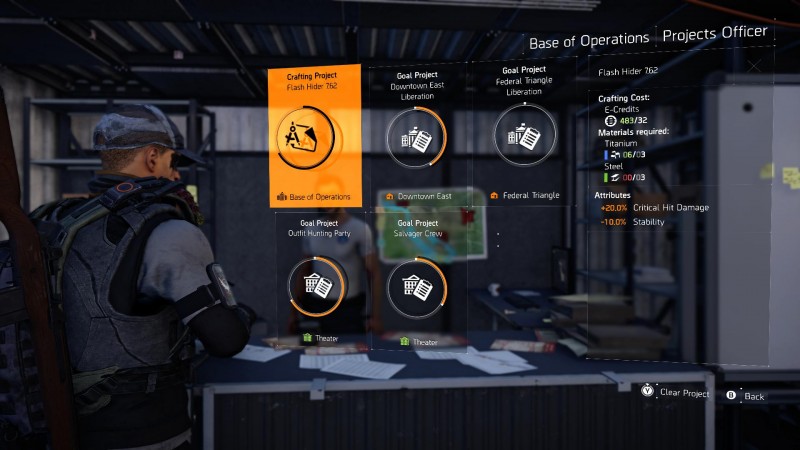
Deconstruct, Sell, or Donate?
You likely won’t have much of a need for cash in the early stages of play, so avoid selling your excess guns. Instead, check the projects desk to see if any of your unwanted gear can help fulfill a project’s objectives. When you finish a project you will earn a variety of things, including weapon mods and firearm blueprints. You gain plenty of experience for donating as well. Dismantle the other stuff that is not needed at the settlements to get materials you can use for crafting; hold off on most crafting until mid- or late-game.
Control Points for Loot
Whenever you see a control point pop up in a district, make a beeline for it. Control Points are short but difficult conflicts against swarms of enemies that conclude with the player being granted access to a supply room filled with loot crates. Even if you don’t get a new item you can immediately put to use, the amount of supplies you get will likely help you in another aspect of the game. Control Points also turn into fast-travel portals.
To Dark Zone or Not?
While you’ll undoubtedly want to try your hand at the Dark Zone at some point, tackling a run while you’re still doing early leveling is a mixed bag. On the plus side, it’s likely that you can snag some especially strong gear on a successful run, and the tension of never knowing who might attack you in the Dark Zone can be tense and fun. A fun system waits inside for gathering gear by going rogue, so there’s reason to engage even if you’re not excited about PvP. However, entering the space on your own without support is a dicey proposition; if you’re going to give it a shot, bringing friends is strongly recommended. Plus, since Dark Zone features its own leveling system, you won’t be moving up the normal leveling curve while you spend time in there. The nice gear might make a short run worth your time investment, but don’t get too lost in the dark before swinging back into the main flow of missions. Return once you get to the endgame, at which point the Dark Zone will be a much more meaningful activity.
Survey the Battlefield
Don’t immediately open fire. Take a good look at the configuration of the battlefield and figure out where the enemy forces are before engaging. You may be able to land a grenade that takes out a group. You also want to find a position that doesn’t offer many options for the enemy to flank you – and they almost always try to, either by rushing you or sending out an R/C car.
The High Ground
In any conflict that is multistory, try to get to the high ground. The sight lines are better for all weapons, especially Turret placement. Even if enemies are behind cover, the Turret will tear them to shreds. To best take advantage of the high ground, sneak into the conflict zone and establish your position.
Positioning and Remaining Hidden
Given how frequently enemies rush your location, you can use blind fire to keep them at bay and protect yourself. Blind fire is generous in how frequently it lands shots on close and mid-range enemies. If you feel your position is compromised, you have to find a new position or you’ll get overrun. If you are playing single player, you can use a Turret as a means of closing down an enemy path.
Faction Keys
When you enter underground or interior locations, keep your eyes peeled for medicine cabinets. If you can interact with one, you’ll likely be given a faction key that can open a specific crate holding rare loot.